How To Configure Mail Clients using IMAP for Office 365 Mailboxes

After reading this article faculty and staff with mailboxes on Office 365 should be able to configure their Outlook client using IMAP. IMAP (Internet Message Access Protocol) is an email protocol used for retrieving and storing incoming mail sent over SMTP.


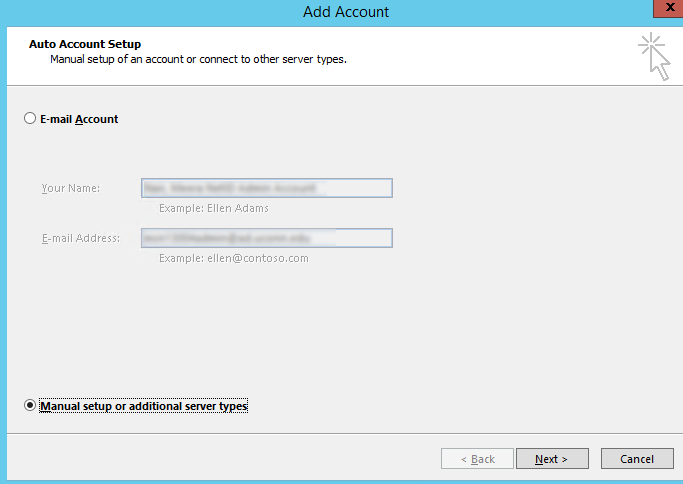
  1. Open Control Panel and click Mail. Click Add to create a new profile. Select “Manual setup or additional server types” as shown below and click Next.

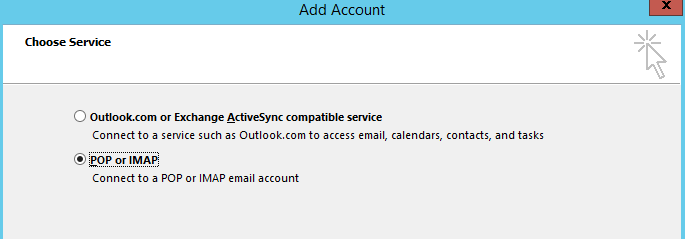
  1. Select “POP or IMAP” and click Next.

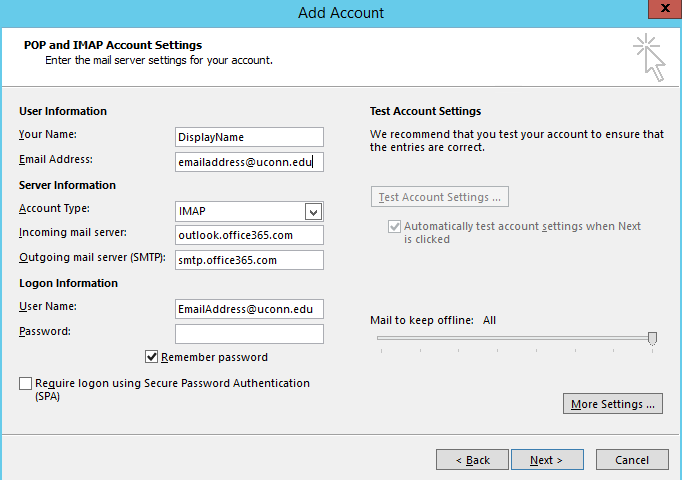
  1. In the POP and IMAP account settings page, fill in the information below:
  • Your name: This will be your display name
  • Email address: This will be your primary UConn email address in the format FirstName.LastName@uconn.edu.
  • Select the Account type as IMAP.
  • Incoming mail server: outlook.office365.com
  • Outgoing Mail Server (SMTP): smtp.office365.com
  • User Name: This will be your primary UConn email address in the format FirstName.LastName@uconn.edu.
  • Password: Your NetID password

Select “Remember password” and click “More Settings

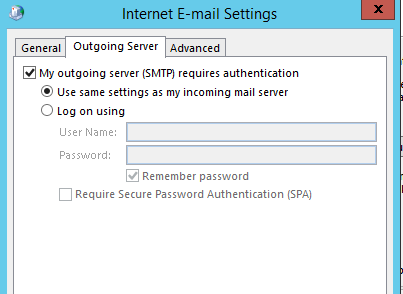
  1. Your email address should auto-populate in the General tab

  1. Click the Outgoing server tab and ensure to select “My outgoing server (SMTP) requires authentication” and “Use same settings as my incoming mail server

  1. Click the Advanced tab update the following:

Incoming mail server (IMAP): 993

            Use the following type of encrypted connection: SSL

            Outgoing server (SMTP): 587

Use the following type of encrypted connection: TLS

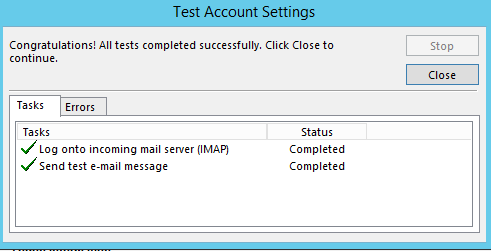
  1. Click OK and then Next. Ensure the Test Account Settings complete successfully and click Finish.

For more information on the configuration: https://support.office.com/en-us/article/pop-and-imap-email-settings-for-outlook-8361e398-8af4-4e97-b147-6c6c4ac95353

How do I get a SharePoint Site?

After reading this article, you will know how to request a SharePoint site and the capabilities it will give you.

SharePoint is a web application framework and platform that enables website development, document and file management, and connections through social networks and includes an enterprise search and business intelligence tools. It is one of several tools in Office 365 that enable file sharing and management and facilitate collaboration. Read Comparison of SharePoint, Groups, and OneDriveto find the right app for you and the task you wish to accomplish.

To get a SharePoint site created for you, send an email to the UITS Help Center (helpcenter@uconn.edu) that states that you are requesting a SharePoint site. This message will create a ticket and a UITS administrator will respond.

Note: You have 1TB of storage per site.


As the requester of the site, you will become the site administrator and will be able to:

  • Create subsite(s) under the main site and assign ownership as desired
  • Self-assist for SharePoint related questions
  • Restore data deleted from a subsite at the site level
  • Enable/disable version history on the site/subsite and restore major versions of documents
  • Customize the SharePoint webpage
  • Manage permissions on the site as desired

Last Modified: 9/12/2017

What is SharePoint?

After reading this article, you should have a better understanding of SharePoint Online and its capabilities.

SharePoint is a web application framework and platform that combines Newsfeed, OneDrive, and Sites and is offered as part of the Office 365 suite. With these three main hubs, SharePoint provides websites, document and file management, social networks, enterprise search, and business intelligence that can facilitate collaboration among team members.

  • Newsfeed: Use the social network to post news for other site members to see.
  • OneDrive: Store, share, and manage files among site members, inside and outside the organization. Documents and files are not assigned to on specific member so that files are not lost when members leave the group.
  • Sites: Create document libraries, lists, calendars and other applications that are useful for file management and collaboration between site members.

Using SharePoint, you can store, organize, share, and access information from almost any device with a web browser.

Last Modified: 9/12/2017

FOIA

Faculty and staff should be aware that emails sent or received by a university email account are most likely public records that are subject to disclosure under the Freedom of Information Act (FOIA). Confidential or private information contained within emails, such as student information protected under FERPA, may be withheld or redacted as appropriate, but most emails of UConn employees are public records subject to disclosure.

For more information on FOIA please visit Public Records at UConn.

How do I use Google Drive with Office files?

After reading this article students, faculty, and staff should be able to:

  • Move files created in Office to Google Drive to allow for easier sharing and simultaneous editing


Move Office files to Google Drive

Files created using Office products, including Word, Excel, and PowerPoint, can be uploaded to Google Drive and then edited in Drive using Google Docs, Google Sheets, and Google Slides.  The files can also be shared with other users and edited simultaneously.  To upload an Office file to Google Drive:

  1. Login to Google Drive.
  2. Click New > File Upload.
  3. Browse your computer and choose the file you wish to upload to Google Drive.
  4. Your file will be uploaded to your My Drive.  From here you can open and edit the document in Drive.


Keywords: Office, files, upload, Google, Drive, edit, Google Docs, Google Sheets, Google Slides,

Last Modified: 7/17/2017

How can I share files with Group members in Google Drive?

After reading this article students, faculty, and staff should be able to:

  • Share a Google Drive document with other Group members


About Sharing files in Google Drive

Drive has the ability to create a document (doc, spreadsheet, presentation, form, or drawing) and share it with a large number of people.  Once a file is shared with other users, you can begin to edit the file simultaneously using Google Docs, Google Sheets, or Google Slides.  You can share files with members outside of the University of Connecticut but you will receive a warning message before you do so.


How to Share files in Google Drive

  1. Open the document you want to share in Google Drive.
  2. Click the Share button in the upper right-hand corner.
  3. Enter the names or email addresses of people you would like to share the document with.
  4. Click the drop-down next to where you enter names to choose a permission level depending on if you want members to read only or be able to edit and change the file.
  5. If you would like to have different permission settings for each user added click Advanced and choose the permission level using the drop-down next to each user’s name.
  6. Click Done.


Keywords: Google Drive, share, files, Group members

Last Modified: 7/17/2017

How do I setup Google Calendar on my mobile device?

After reading this article student, faculty, and staff should be able to:

  • Setup their Google Calendar on any of the following mobile devices:
    • iOS device
    • Android device
    • Windows phone


Note: 

This article applies to built-in calendar apps on your mobile device.  For iOS and Android devices, you also have the option of downloading the Google Calendar app from the App store or Google Play store. For information on how to setup applications made by Google, see How do I use G Suite apps on my mobile device?


iOS device

If your Gmail account isn’t set up on your iOS device:

  1. Go to Settings > Calendar >Accounts > Add Account.
  2. Choose Google.
  3. Enter your FirstName.LastName@uconn.edu and press Next.
  4. Enter your NetIDPassword then press NEXT.
  5. Select Calendar and any other Apps you want your account to use.
  6. Press Save.
  7. If you do not have a passcode setup, press Continue when Passcode Requirement popup.
  8. Enter new passcode and press Continue.
  9. Re-enter your new passcode and press Save.


If your Gmail account is already set up on your iOS device:

  1. Go to Settings > Calendar >Accounts.
  2. Choose your UConn G Suite Account.
  3. Press the toggle next the Calendars to enable it.  Green means it is enabled.


Android device

If your Gmail account isn’t set up on your Android device:

  1. Open Settings.  Navigate to Accounts > +Add account.
  2. Select Google.
  3. Select Existing.
  4. Login using your G Suite account and wait for your account to sync.
  5. Click on your Google Account under Accounts and make sure that the Calendar is checked off.


If your Gmail account is already set up on your Android device:

  1. Open Settings.  Navigate to Accounts.
  2. Tap your Google Account in the list of accounts.
  3. Tap your Google username.
  4. Ensure that the Calendar box is checked so that your Google calendars get synced.


Windows phone

If your Gmail account isn’t set up on your Windows phone:

  1. Navigate to Settings.
  2. Under system, choose emails + accounts
  3. Select add an account
  4. ChooseGoogle from the list of accounts.
  5. Enter your firstname.lastname@uconn.edu email into the Email address field, and your UConn Google apps password into the Password field. Click next.
  6. You can then choose to sync email only or email, contacts, and calendar. Once a choice is selected, click sign in and the phone should start syncing your information.


If your Gmail account is already set up on your Windows phone:

  1. Navigate to Settings.
  2. Under system, choose emails + accounts
  3. Select your Google account.
  4. Ensure that Calendar is enabled.


Keywords: Calendar, mobile device, Google, G Suite, setup, iOS, Android, Windows phone,

Last Modified: 7/17/2017

How do I setup Google Calendar on my computer?

After reading this article students, faculty, and staff should be able to:

  • Setup their Google Calendar on any of the following operating systems:
    • Windows 8 Calendar
    • Windows 10 Calendar
    • Apple Calendar on Mac OS

Windows 8 Calendar

The Calendar and Mail apps are linked, so if you’ve already set up an account in Mail, it will show up in Calendar as well. If not, you can add it manually in the Calendar app.


  1. Open the calendar application.
  2. Point your mouse to the lower-right of the screen and click the Settings gear.
  3. Click Accounts > Add an account.
  4. Click Google.
  5. Login using your UConn G Suite account and click Connect.


Windows 10 Calendar

The Calendar and Mail apps are linked, so if you’ve already set up an account in Mail, it will show up in Calendar as well. If not, you can add it manually in the Calendar app.


  1. Point your mouse to the lower-left of the screen and click the Settings gear.
  2. Click Manage Accounts > + Add account.
  3. Click Google.
  4. Login using your UConn G Suite account and follow the on-screen instructions.


Apple Calendar on Mac OS

  1. Open the Calendar application from the dock.
  2. Click on Calendar in the menu bar.
  3. Select Add Account from the drop-down list
  4. Select Google and click Continue.
  5. Enter a Name for the account as well as a UConn or personal Gmail email address. Then enter the Password and click Set Up.
  6. Make sure Calendar is checked off and select Done.
  7. Your Google Apps account will now appear under the Calendars list to the left of the Calendar. Events can be added and removed from the calendar through both Google Apps and Apple Calendar.

Keywords: Google Calendar, desktop, computer, Mac, Windows, Apple Calendar

Last Modified: 7/13/2017

How do I import a calendar into Google calendar?

After reading this article students, faculty, and staff should be able to:

  • Import a calendar saved as one of the following formats into their Google Calendar
    • .csv
    • .vcs
    • .ical


Note: 

If you want all these events on an entirely new calendar, you will have to create one separately prior to importing.


Import a Calendar


  1. Open Google Calendar.
  2. Next to Other Calendars click the drop-down arrow, then Import Calendar.
  3. Click Browse to choose the file you would like to import (.ical or .csv), then click Open.
  4. Select the Google Calendar where you would like to import these events, then click Import.


Note:

Recurring events may not be recognized when importing from CSV files. In this case, individual items will have to be readjusted.

Keywords: calendar, import, Google Calendar

Last Modified: 7/13/2017

How can I create a shared calendar in Google Calendar?

After reading this article students, faculty, and staff should be able to:

  • Create a shared calendar in Google Calendar which other group members can be invited to subscribe to


Google Calendar

  1. Login to Gmail.
  2. Click the apps symbol   and select Calendar.
  3. In the left pane, click the drop-down menu next to “My Calendars” and click Create new calendar.
  4. In the Create new calendar options you can name the calendar, give it a description, and give it a location.
  5. To share this calendar with specific people, navigate to the “Share with specific people section.”
  6. Enter the email of the person you want to add, choose their permission settings, and click Add Person.  Repeat this for all members you would like to add.
  7. Click Create Calendar to finish.
  8. This shared calendar request will be sent out via Gmail to all members and can be overlaid on everyone’s personal calendar.


Keywords: calendar, Google, create, shared

Last Modified: 7/12/2017