365 Support

How do I invite others to join an Office 365 Group?

After reading this article students, faculty and staff should be able to:

  • Invite other members either within or outside of UConn to an existing Group using any of the following email clients:
    • Office 365 Mail App
    • Outlook 2016 for Windows

Groups are shared workspaces available through Office 365. Each shared workspace has a shared inbox, calendar, document library, OneNote notebook, and planning tool.


Office 365 Mail App

Invite people within UConn

  1. Login into Office 365 using your UConn account and open Mail.
  2. On the left navigation pane, select the group you want to invite others to join.
  3. If you don’t see Groups, click the arrow next to Folders to go back to the main navigation pane.
  4. Do one of the following:
  5. On the menu bar, select More group actions  > Invite others.
  6. At the top of the page, select the name of the group, and select More actions  > Invite others.
  7. Do one of the following:
  8. Select Copy to copy a link to the group to your clipboard. Paste the link into a message to share it with others.
  9. Select Email to open a compose window with a link to join the group.
  10. Finish composing the mail and click Send.
  11. Invite people outside UConn
  12. Login into Office 365 using your UConn account and open Mail.
  13. In the navigation pane, under Groups, select your group.
  14. If you don’t see Groups, click the arrow next to Folders to go back to the main navigation pane.
  15. In the group header, select  > Members.
  16. Select Add members.
  17. Enter the email address of the guest. You’ll see a message informing you that the owner must approve the addition of the guest.
  18. Choose Save.


Outlook 2016 for Windows

Invite people within UConn

  1. Open Outlook 2016.
  2. Under Groups in the left nav, select your group.
  3. On the Groups ribbon, select Add Members.
  4. In the Add people box, search for people within your organization either by their full name or email address, and then select the names to add.
  5. Click OK.

Invite people outside UConn

  1. Open Outlook 2016.
  2. Under Groups in the left nav, select your group.
  3. On the Groups ribbon, select Add Members.
  4. In the Add people box, enter the email address of the guest and press Enter. Red text reminds you that guests will have access to group content.
  5. Select OK.


Keywords: Groups, invite, members, internal, external, Mail App, Office 365, Outlook, Windows


Last Modified: 7/7/2017
How do I join an Office 365 Group?

After reading this article students, faculty, and staff should be able to:

  • Join an existing Group in Office365 by using the following email clients:
    •  Office 365 Mail app
    • Outlook 2016 for Windows
    • Outlook Mobile app

Groups are shared workspaces available through Office 365. Each shared workspace has a shared inbox, calendar, document library, OneNote notebook, and planning tool.


Office 365 Mail App

  1. Login into Office 365 using your UConn account and open Mail.
  2. In the navigation pane, under Groups, select Discover.
  3. If you don’t see Groups, click the arrow next to Folders to go back to the main navigation pane.
  4. If you don’t see Discover, expand the Groups section.
  5. All available groups will be listed in alphabetical order. Select the one you want and click Join. If the group is public, you’ll see a confirmation message and become a member right away. If the group is private, type a reason why you want to join > Send.
  6. Once you’ve joined a group you’ll receive a welcome message that contains important information and links to help you get started. If the group is public, you’ll get the message right away. If the group is private, you’ll get the welcome message after you’ve been approved by group owner.


Outlook 2016 for Windows

Search for a Group to join

  1. On the Home tab, select Browse Groups.
  2. Enter a group name in the search box or scroll the list to find the one you want.
  3. Click Join. If the group is private, a request will be sent to the group’s admin, who can accept or decline the request.


Join a Group from an email

  1. If you receive an email message from a group that you’re not a member of and decide to join the group, select Join on the group header in the right corner of the reading pane.
If the group is private, you’ll see Request to Join instead, and will be asked to provide a reason for joining.
  2. Wait for your request to go through, or for the group’s admin to add you if you’re trying to join a private group.
  3. Once you’ve joined the group, you’ll see detailed membership status as well as a shortcut to navigate to the group’s inbox.


Go to a Group that you were added to as a member

  1. When you’re added to a group, you receive an email notification. Open the email and click Go to the group link.
  2. Use the options on the ribbon to start a conversation, change your membership status, and so on.
  3. You can also go to the Explore the group section in your email notification to view the conversations as well as the group’s calendar and files.
 
All the groups that you’ve created or were invited to are on the left nav bar under Groups. You can access any of them by just clicking the group name. Then, you can participate in the conversations or use the options on the ribbon to access the files, calendar, notebook, and other information.


Keywords: Groups, Office 365, Outlook, Mail app, join,

Last Modified: 7/7/2017

How do I create an Office 365 Group?

  • Create an Office 365 Group in the following email clients:
    •  Office 365 Mail App
    • Outlook 2016 for Windows

Groups are shared workspaces available through Office 365. Each shared workspace has a shared inbox, calendar, document library, OneNote notebook, and planning tool.

Note: 

An Office 365 group is different from a contact group.  A contact group is a set of email addresses used only to send emails or meeting invitations to all email addresses in the contact group.


Office 365 Mail App

  1. Login into Office 365 using your UConn account and open Mail.
  2. In the navigation pane, next to Groups, select the + button.
  3. If you don’t see Groups, click the arrow next to Folders to go back to the main navigation pane.
  4. If you don’t see Discover, expand the Groups section.
  5. Choose either Standard Group or Professional Learning Community and click Next.
  6. In Choose a name, enter a group name that briefly captures the spirit of the group.
  7. A suggested email address is provided. To assign a different email address to your group which will be part of the group URL, type in a new email address.
If you see “not available,” the group ID is already in use. Try something different. Note that once you choose a group ID, it cannot be changed.
  8. In Add a description, enter a detailed description of the group to help others understand its purpose. This description will be included in the welcome email when others join the group.
  9. In Privacy, do one of the following:
  10. To create a group in which anyone within your organization can view its content and become a member, select Public.
  11. To create a group in which membership requires approval by a group owner and only members can view group content, select Private.
  12. To enable subscribed members to receive email and calendar event notifications in both their group inbox and personal inbox, select Send copies of all group messages and events to members’ inboxes. This is recommended when members belong to multiple groups because it means they can see all group notifications in one place without having to visit each group mailbox in order to stay current with group activity.
  13. Select Create.
  14. If you’re ready to add internal members to your newly created group, continue with the create group wizard. Otherwise, select Not now. To add group members later, see How do I invite others to join a Group?

Outlook 2016 for Windows

  1. Open Outlook 2016.
  2. On the Home tab, choose New Group.
  3. In the Create Group window, enter the required information, including NameGroup ID, and Privacy level, (Public or Private). You won’t be able to change the group ID after you create the group.
  4. Check the subscription box to let members receive the group’s emails in their regular inbox or keep it un-checked if you prefer that they access the group’s mail only from the group’s inbox, and then click OK.
  5. Add the members (you aren’t able to add external users at this time), description, and a photo for the group, and then click OK. You can add members after the group is created as well.
  6. Click OK. You’ll see your newly created group in the left nav and a Welcome email in your group’s inbox.


Keywords: Groups, Office 365, Mail app, Outlook, Windows

Last Modified: 7/7/2017
Comparison of SharePoint, Groups, and OneDrive

After reading this article students, faculty and staff should be able to:

  • Compare the differences between SharePoint, Groups, and OneDrive all of which are available through Office 365


SharePoint

SharePoint is a web application framework and platform that allows you to create different sites for different teams.  On these sites you can create document libraries, lists, calendars and other applications useful for file management and collaboration between site members.  SharePoint also incorporates a social network in which you can post news for other site members to see.  Using SharePoint, you can store, organize, share, and access information from almost any device with a web browser.

Groups

A Group is a shared workspace for email, conversations, files, and calendar events where group members can conveniently collaborate. You can create new or join existing groups using Outlook .  Within these groups, members can use a group calendar for scheduling meetings, share files via OneDrive, edit documents simultaneously, and post in discussion threads.

OneDrive

OneDrive is cloud storage service in which you can save personal files, share them with others, and edit the files simultaneously via the Office Online products, which are Word, Excel, PowerPoint, and OneNote.  OneDrive offers unlimited data storage and can be accessed from any device that connects to the internet.

SharePoint Groups OneDrive
Personal Documents X
Share Documents with Others X X X
Simultaneously Edit Documents X X X
Group Calendars X X
Post discussion threads X X
All Document Types Allowed X X
Unlimited Storage X X

Keywords: SharePoint, Groups, OneDrive

Last Modified: 6/19/2017

What file types and names can I save to OneDrive?

After reading this article students, faculty, and staff should be able to:

  • Determine what file types and names can be saved to their OneDrive

OneDrive is cloud-based storage available through Office 365.  UConn users have unlimited storage and can save all types of files and photos and access them from anywhere on any device connected to the internet.  Documents can also be shared and edited simultaneously using the Office Online products.

File Types Allowed in OneDrive

All file types are allowed to be saved to OneDrive for Business on Office 365.  There are no invalid files types of files or file extensions. There are restrictions to the names of files saved.


Invalid characters for file and folder names in OneDrive

Paths for a document location which include the folder and file name cannot exceed more than 400 characters total.   File and folder names in OneDrive for Business on Office 365 cannot contain any of the following characters:

Name Symbol
Quotation marks
Asterix *
Less than symbol <
Greater than symbol >
Question mark ?
Slash /
Backslash \
Vertical Bar |

Keywords: OneDrive, file, folder, name, path, character, invalid, Office 365

Last Modified: 7/6/2017

How do I setup OneDrive on my computer?

After reading this article students, faculty, and staff should be able to:

  • Setup OneDrive on the following operating systems:
    • Windows
    • Mac

OneDrive is cloud-based storage available through Office 365.  Users can save all types of files and photos and access them from anywhere on any device connected to the internet.  Documents can also be shared and edited simultaneously using the Office Online products.

Why setup OneDrive on my computer

By setting up OneDrive on your computer, you can save files directly to your OneDrive.   You can also sync specific folders on your OneDrive with your computer. When a folder on your computer and your OneDrive are synced, it means that when a file is saved to one destination it is automatically saved in the other location.  By syncing only specific folder, you can better control the amount of space OneDrive files take on your computer.

Setup OneDrive on Windows

  1. Download the Windows version of the OneDrive sync client.
  2. Double click the download to begin installing and follow the on-screen instructions.
  3. Follow one of the two setup methods available below:
    • Setting up OneDrive for the first time
    • Setting up OneDrive for an additional account

Setting up OneDrive for the first time

  1. Select the Start button, search for “OneDrive” and open it.
  2. Enter your UConn Office 365 email address and select Sign in.
  3. Enter the password for your UConn Office 365 account and click Sign in.
  4. Click Next to setup default folder location or click Change Location to change the folder location.
  5. On the Sync files from your OneDrive screen, choose the folders you want to sync from OneDrive to your computer and click Next.  For more information on what syncing folders means see the “Why setup OneDrive on my computer” section.
  6. To finish click Open my OneDrive.

Setting up OneDrive for an additional account

  1. In the taskbar navigation area, right-click the white OneDrive cloud icon and select Settings.
  2. In Settings, select Account and then click Add an account.
  3. Enter your UConn Office 365 email address and then click Sign in.
  4. Enter the password for your UConn Office 365 account and click Sign in.
  5. Click Next to setup default folder location or click Change Location to change the folder location.
  6. On the Sync files from your OneDrive screen, choose the folders you want to sync from OneDrive to your computer and click Next.  For more information on what syncing folders means see the “Why setup OneDrive on my computer” section.
  7. To finish click Open my OneDrive.

Setup OneDrive on Mac

  1. Download OneDrive for Mac.
  2. Double-click the download to begin installing and follow the on-screen instructions.
  3. Follow one of the two setup methods available below:
  4. Setting up OneDrive for the first time
  5. Setting up OneDrive for an additional account

Setting up OneDrive for the first time

  1. Select the Launchpad, search for “OneDrive” and open it.
  2. Enter your UConn Office 365 email address and select Sign in.
  3. Enter the password for your UConn Office 365 account and click Sign in.
  4. Click Next to setup default folder location or click Change Location to change the folder location.
  5. On the Sync files from your OneDrive screen, choose the folders you want to sync from OneDrive to your computer and click Next.  For more information on what syncing folders means see the “Why setup OneDrive on my computer” section.
  6. To finish click Open my OneDrive.

Setting up OneDrive for an additional account

  1. Click the OneDrive cloud icon up in your Menu bar and select Preferences.
  2. Click the Account tab and in the new Add Account group, select Add a Business Account to start OneDrive Setup.
  3. Enter your UConn Office 365 account and click Sign in.
  4. Enter the password for your UConn Office 365 account and click Sign in.
  5. Click Next to setup default folder location or click Change Location to change the folder location.
  6. On the Sync files from your OneDrive screen, choose the folders you want to sync from OneDrive to your computer and click Next.  For more information on what syncing folders means see the “Why setup OneDrive on my computer” section.
  7. To finish click Open my OneDrive.

Keywords: OneDrive, sync, Windows, Mac, Office 365, setup

Last Modified: 7/6/2017

How do I stop legitimate email messages from going into my SPAM folder?

After reading this article students, faculty and staff should be able to:

  • Stop legitimate email messages from going into their SPAM folder on any of the following email clients:
    • Outlook for Windows
    • Outlook for Mac
    • Apple Mail

SPAM filters are a filtering system setup to protect our email accounts from unwanted and potentially dangerous messages.

Stop legitimate email messages from going into my SPAM filter

Sometimes a SPAM filtering system misidentifies legitimate email messages as SPAM and sends them to the junk folder in your mailbox. If you discover that an email was mistakenly sent to your junk folder, you can follow the steps provided below to identify it as “not junk.”  With a few steps – and occasionally monitoring your junk folder – you can customize the server and correct this misidentification. Over time and as more users engage in these corrective actions, the server will filter with even greater accuracy.

Outlook for Windows

  1. Go to the junk folder in your mailbox.
  2. Right click on the email and select Junk > Not junk.
  3. A pop-up will appear check the box by “Always trust e-mail…” to ensure that the sender address will not be blocked again in the future. Click OK, to move the message back to your inbox.

Outlook for Mac

  1. Go to the Junk E-mail folder in your mailbox.
  2. Right click on the email and select Junk Mail > Mark as Not Junk

How do I remove an email account from a mobile device?

After reading this article students, faculty, and staff should be able to:

  • Remove an email account from any of the following mobile devices:
    • iOS Devices
    • Android Devices
    • Windows mobile devices
Note:Removing an email account from a mobile device also removes any calendar events and contacts also associated with the account.


iOS Devices

iOS Mail App

  1. Go to Settings> Mail>Accounts> Add Account.
  2. Select the account you want to remove and click Delete Account.
  3. Click Delete Account to confirm.

Outlook App for iOS

  1. Open the Microsoft Outlook app.
  2. Navigate to Settings.
  3. Select the account you want to remove and select Delete Account.
  4. Click Delete to confirm.

Android Devices

Android Mail App for Office 365 email

  1. Open the email account.
  2. Select Menu () and Settings.
  3. Select the email you wish to remove.
  4. Scroll to bottom and select Delete Account.
  5. Click OK to confirm.

Gmail Account 

  1. On your phone, navigate to Settings > Accounts & Sync.
  2. Select the Gmail you wish to remove.
  3. Select Menu () and Remove Account.

Outlook App

  1. Open the Microsoft Outlook app.
  2. Navigate to Settings.
  3. Select the account you want to remove and select Delete Account.
  4. Click Delete to confirm.

Windows Mobile Devices

  1. Navigate to Settings > email + accounts.
  2. Press and hold down on the email you want to remove.
  3. Press Delete and then Delete again to confirm.

Keywords: email, mobile, device, iOS, Android, Windows, Outlook, phone, remove

Last Modified: 6/20/2017

How do I protect sensitive information in my Office 365 email?

After reading this article faculty and staff should be able to:

  • Apply Information Right Management (IRM) from Outlook for their Office 365 email

Information Rights Management (IRM) is a way for users to protect sensitive information contained inside emails. Usage rights are given to the email using Active Directory Rights Managements Services (AD RMS) and allows users to control rights, actions, and permissions (e.g., who can view the message, restrictions on forwarding and printing).

Apply IRM from Outlook

  • Open New email from Outlook > IRM can be applied by going to Options, and then Permissions.
  • From here, you can choose one of the four permission policies listed.  The four policies are:
      • Unrestricted access: This is the default setting for permissions when you send an email. Senders and recipients have full permissions to the email, including the rights to forward, edit, save, reply etc.
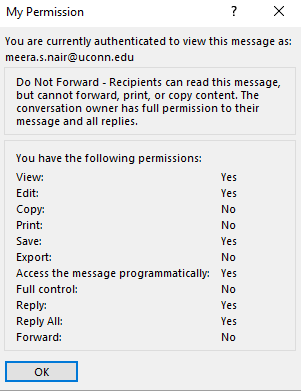
      • Do Not Forward: Recipients of these emails can Reply, Edit and Save the email but cannot forward to internal or external users. The forward button on the email will be grayed out. The recipient of the email will see the message below:

    do not forward image

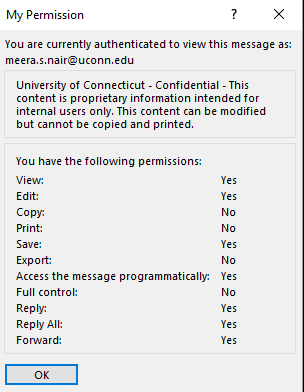
      • University of Connecticut – Confidential: This message will be intended for users inside the organization only. The recipients will have full permissions to the email.

    confidential image

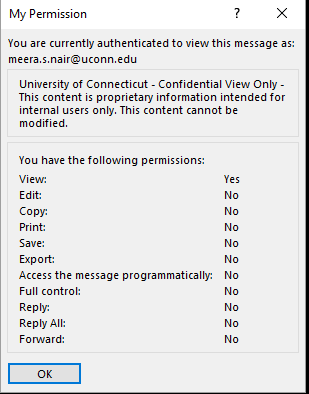
        • University of Connecticut – Confidential View Only: This message will be intended for users inside the organization only, and they can only view it. The recipients cannot save, edit, reply, or forward the email.

      confidentila view image

Keywords: IRM, information rights, Outlook, access, restricted, unrestricted, confidential


Last Modified: 6/26/2017

How do I use email encryption for Office 365?

After reading this article faculty and staff should be able to:

  • Encrypt email messages being sent and open received encrypted emails

Encryption is a useful feature for sending and receiving private and confidential information. The encrypt message permission will encrypt the content and any attachments sent with the email. This encryption capability applies to use cases where messages containing confidential information are sent to external email systems, which includes Google Apps for students.

Encrypting Emails

  1. Emails can be encrypted by including any of the text below in the subject of the email.
    1. (encrypt)
    2. [encrypt]
    3. {encrypt}

Please note: A space must follow the closing punctuation to encrypt the message (e.g., [encrypt] subject of message).

Opening Encrypted Emails

Recipients will receive the email with a .html attachment. Follow the steps below to open the email:

  1. Open the encrypted message received.
  2. Click the dropdown next to the message.html attachment.
  3. Click Download to open the file.
  4. In Outlook Mail, click Open.
  5. At the opening Mail Attachment window, click Open again.
  6. A webpage will open displaying two options for opening the content of the encrypted message.
  1. To open using the Sign in option:
    • Click Sign in.
    • Click Work or school account.
    • Sign into Office365 using your UConn email address and password.
    • The encrypted message should be displayed.
    • From here, you can reply to or forward the message. Reply messages and forwards will be automatically encrypted.
  2. To open using the One-time passcode option:
    • Click Use a one-time passcode.
    • You will then receive an email in your recipient mailbox containing a Passcode as shown below:
    • Enter the Passcode provided in the email into the webpage.
    • The encrypted message should be displayed.
    • From here, you can reply to or forward the message. Reply messages and forwards will be automatically encrypted.

Note: If the encrypted email has been sent to an alias email account, the passcode method will need to be used.

Emails with the Do Not Forward, University of Connecticut – Confidential and University of Connecticut – Confidential View Only appears with a restricted red icon as shown below:

red icon sample image

Keywords: encryption, encrypted, email, attachments, Office 365

Last Modified: 6/26/2017